こんにちは!
第3事業グループのankunです。
私は、航空業界や航空機・エアバンド(航空無線)などが大好きで、新千歳空港や丘珠空港で航空機を撮影しながら無線機を持ってエアバンドを聞いています。

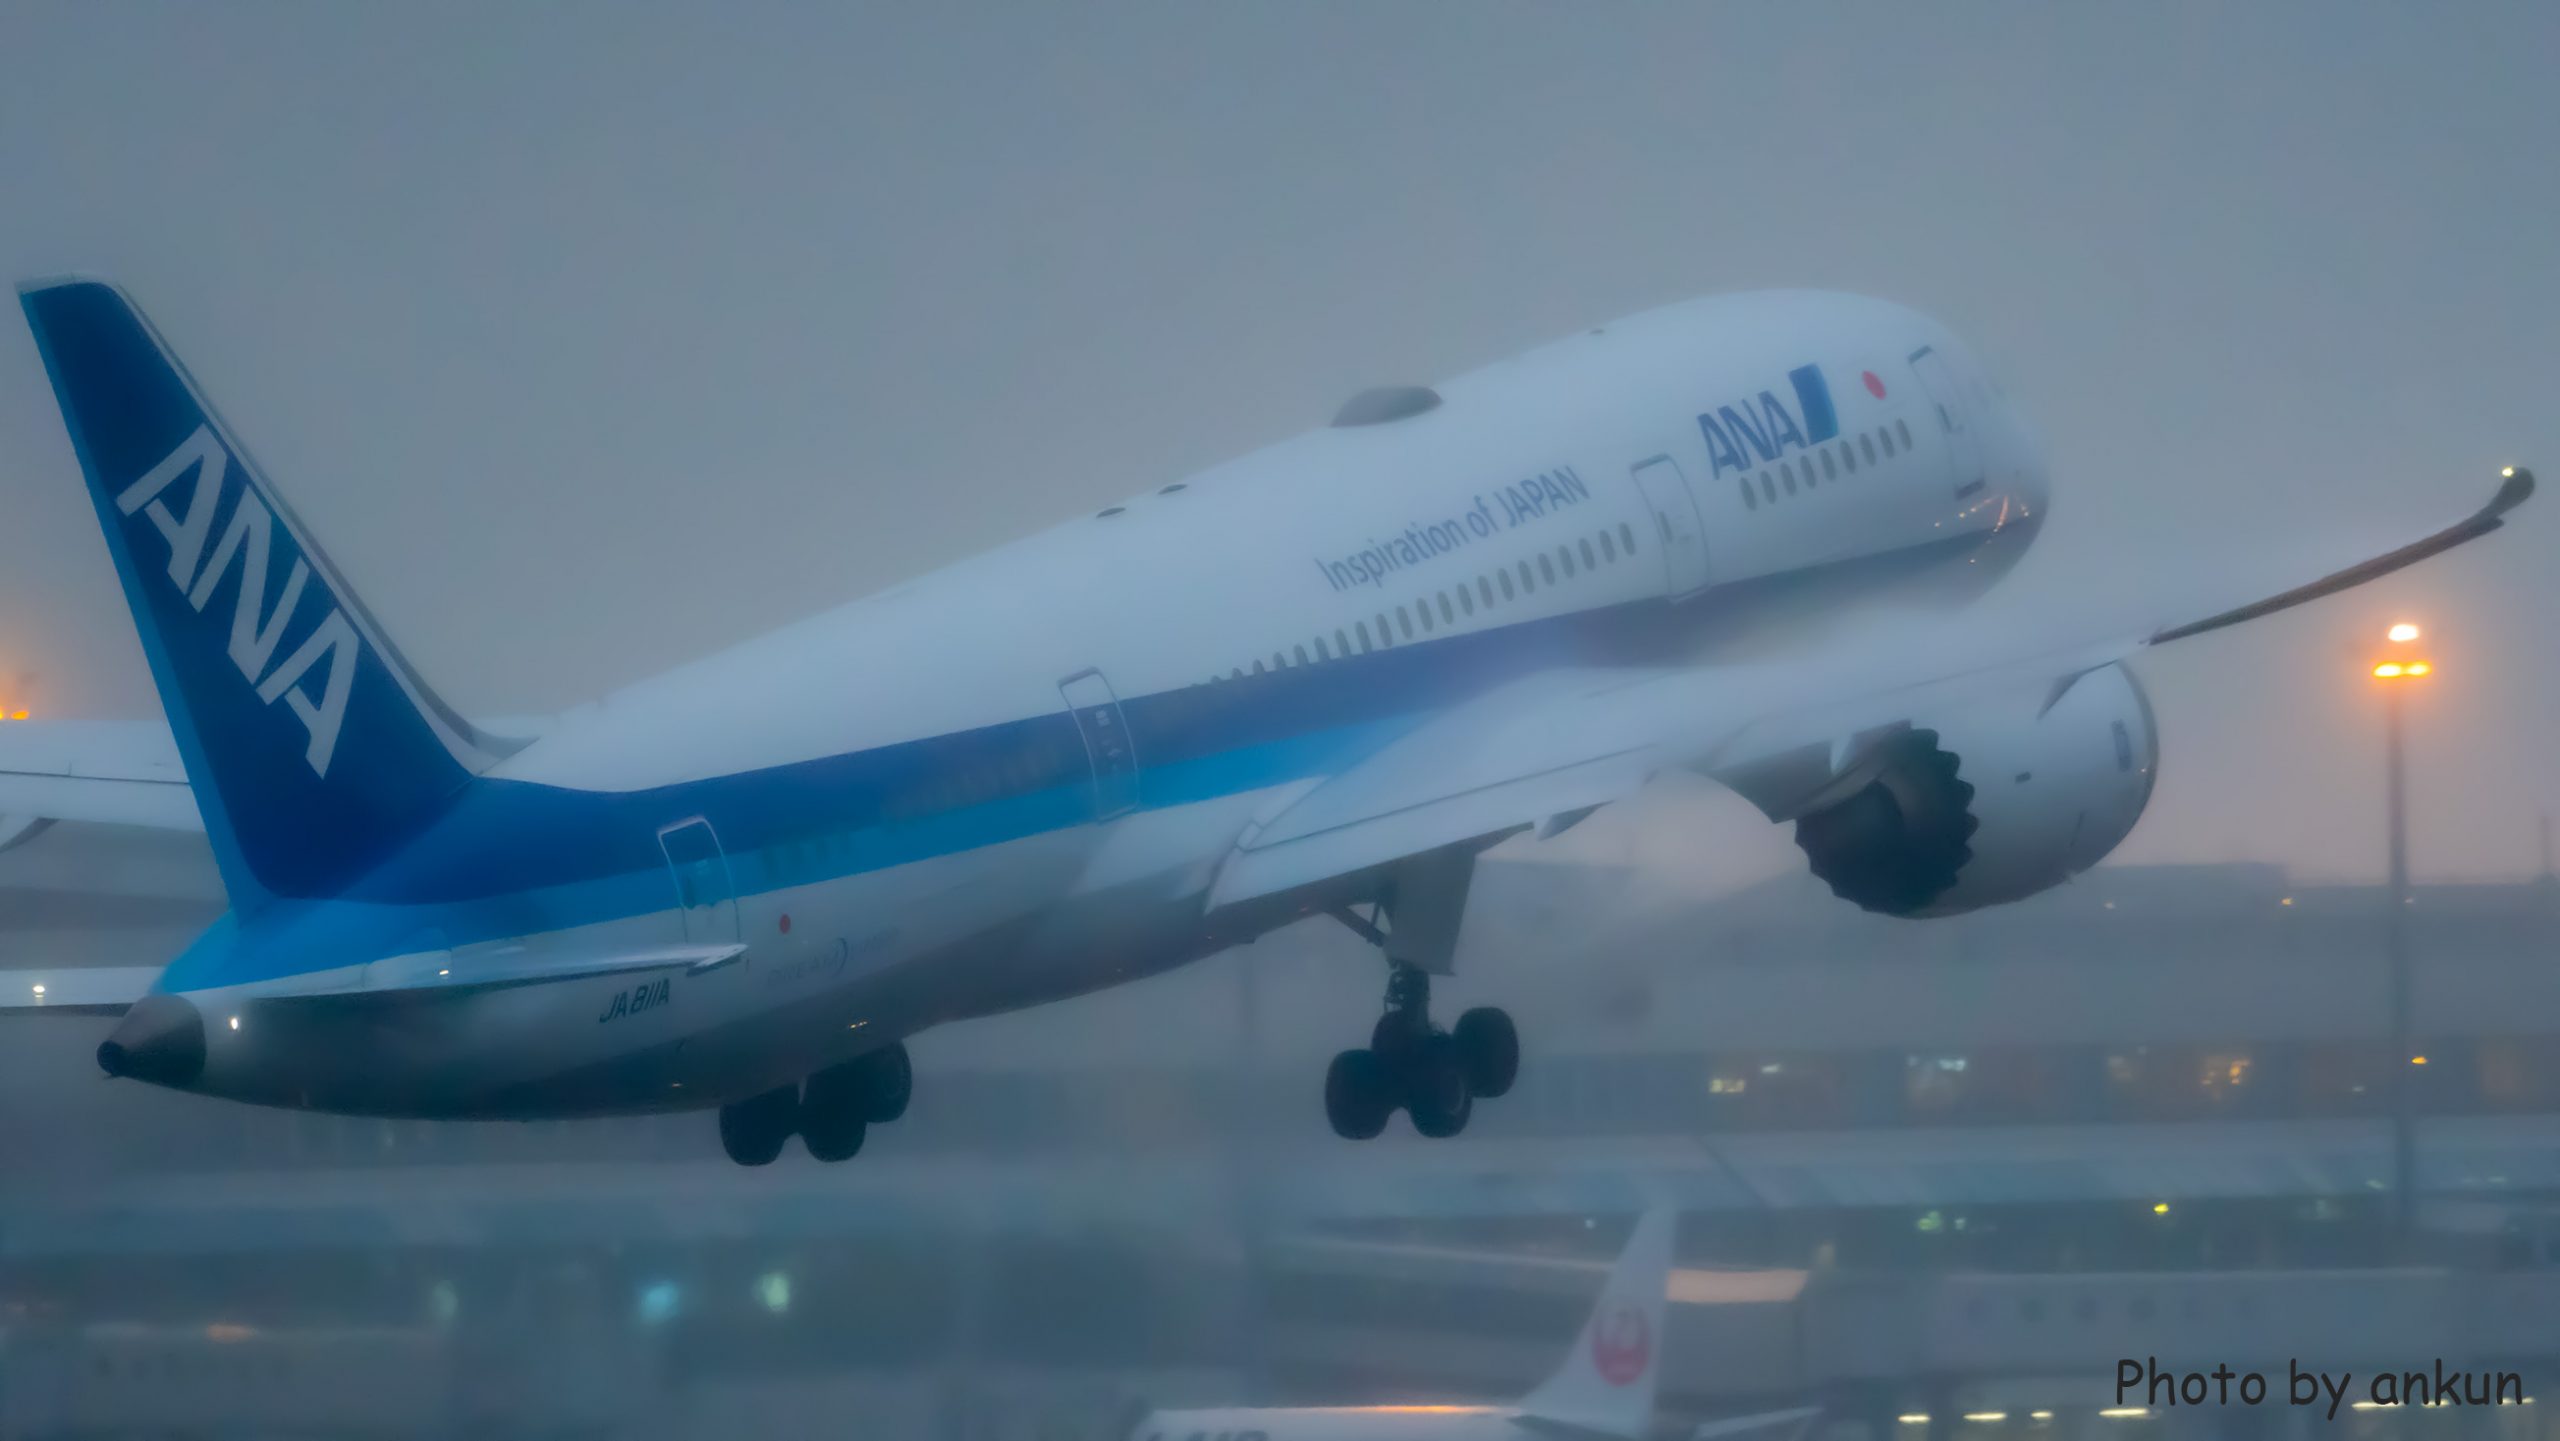
~Positive Climb! Gear Up!! Boeing 787-8 Dreamliner ~
Location:New Chitose Airport (RJCC) / 生コンポイント
📷α6600 + SIGMA 150-600mm F5-6.3 DG OS HSM
航空機が今どこをどのように飛んでいるかを知るにはスマートフォンやWebサービスで「FlightAware」や「Flightradar24」が有名です。
出張が多い方などは見たことがあるかもしれません。
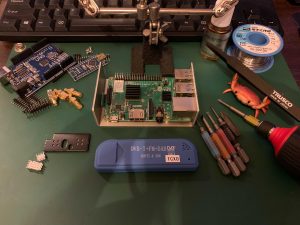
先日、父親の遺品を漁っていましたら、入院中に使っていたUSBドングル型のワンセグTVチューナが出てきました。
SDR(ソフトウェア無線)が楽しめるチップセット(RTL2832など🦀)を使ったもので、しばらくフリーソフトなど活用して遊んでいました。
ただ、中の水晶が熱に弱く長時間使用していると周波数がドリフト(時間が立つとズレていく)してしまいました。
そこで、熱対策を施した製品があるとのことで購入してみました。
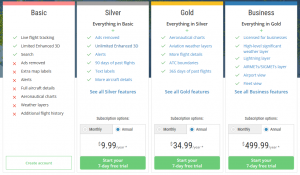
安い物ですが、折角購入したので、普段航空機を追跡するのに使用している「Flightradar24」を、ベーシックプラン(広告や制限あり)からADS-Bデータを受信し提供することで、無料でビジネスプランを利用することができます。
※ADS-B (Automatic Dependent Surveillance-Broadcast) 人工衛星(GPS)をベースに、精度の高い航空機の位置通報や管制が行える装置
ベーシックプランでは下のように広告やら、一定時間で強制タイムアウト、航空機のADS-Bデータのスコークなど全てデータが表示されません。
※因みに、ビジネスプランは年間$499.99で財布にとても優しくありません😱
「Flightradar24」のアカウント
Flightradar24.comで無料のアカウントを作成しておきます。
作成したアカウントでADS-Bデータをフィードします。
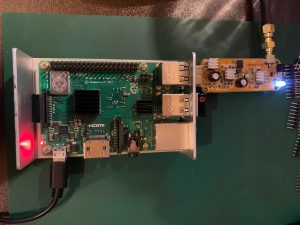
Raspberry Pi
今回はRaspberry Pi 3B+が転がっていたので、こちらを使用します。
USBドングル型チューナー
RTL2832などSDRが出来るもの。
アンテナ
エアバンドはVHF帯のAMで、今回受信したいADS-Bは1030MHz(UHF)なので、別途、数センチのアンテナを用意しました。
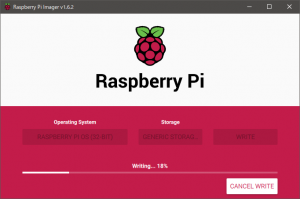
raspberrypi.orgからRaspberry Pi ImagerをダウンロードしてRaspberry Pi OSをインストールします。
今回は[Raspberry Pi OS with desktop and recommended software]をインストールしましたが、用途が限られているので、[Raspberry Pi Lite]でもいいと思います。
「Flightradar24」から提供されているソフトをインストールします。
ADS-Bデータを受信し「Flightradar24」にフィードするソフトです。
コンソールから以下のコマンドを実行します。
sudo bash -c "$(wget -O - https://repo-feed.flightradar24.com/install_fr24_rpi.sh)"
インストールが終了するとそのまま設定に入ります。
______  _  _         _      _                    _              _____    ___
|  ___|| |(_)       | |    | |                  | |            / __  \  /   |
| |_   | | _   __ _ | |__  | |_  _ __  __ _   __| |  __ _  _ __`' / /' / /| |
|  _|  | || | / _` || '_ \ | __|| '__|/ _` | / _` | / _` || '__| / /  / /_| |
| |    | || || (_| || | | || |_ | |  | (_| || (_| || (_| || |  ./ /___\___  |
\_|    |_||_| \__, ||_| |_| \__||_|   \__,_| \__,_| \__,_||_|  \_____/    |_/
               __/ |
              |___/
[main][i]FR24 Feeder/Decoder
[main][i]Version: 1.0.25-3/generic
[main][i]Built on Apr  8 2020 07:06:55 (HEAD-5e8ef0c.git/Linux/static_armel)
[main][i]Running on: raspbian9
[main][i]Local IP(s): 192.168.11.10
[main][i]Copyright 2012-2020 Flightradar24 AB
[main][i]https://www.flightradar24.com
[main][i]DNS mode: PING
Welcome to the FR24 Decoder/Feeder sign up wizard!
Before you continue please make sure that:
 1 - Your ADS-B receiver is connected to this computer or is accessible over network
 2 - You know your antenna's latitude/longitude up to 4 decimal points and the altitude in feet
 3 - You have a working email address that will be used to contact you
 4 - fr24feed service is stopped. If not, please run: sudo systemctl stop fr24feed
To terminate - press Ctrl+C at any point
Step 1.1 - Enter your email address (username@domain.tld)
$: xxxxx@bitstar.jp <-Flightradar24のアカウント作成時に使用したメールアドレスを入力
Step 1.2 - If you used to feed FR24 with ADS-B data before, enter your sharing key.
If you don't remember your sharing key, you can find it in your account on the website under "My data sharing".
https://www.flightradar24.com/account/data-sharing
Otherwise leave this field empty and continue.
$: <-そのままEnter
Step 1.3 - Would you like to participate in MLAT calculations? (yes/no)$: yes <-yesを入力
IMPORTANT: For MLAT calculations the antenna's location should be entered very precise!

機器の設置場所を入力します。(Googleなどで簡単に調べられます。)

弊社の座標と標高を入力します
緯度= 43.05203425(北緯43度3分7秒323)
経度= 141.35950416(東経141度21分34秒214)
標高= 25.1 m

Step 3.A - Enter antenna's latitude (DD.DDDD)
$:43.05203425
Step 3.B - Enter antenna's longitude (DDD.DDDD)
$:141.35950416
Step 3.C - Enter antenna's altitude above the sea level (in feet)
$:82 <-フィートで入力(中央区なので低いですね…)
Using latitude: 43.05203425, longitude: 141.35950416, altitude: 82ft above sea level
Validating email/location information...OK
The closest airport found is ICAO:RJCO IATA:OKD near Sapporo. <-最寄りの空港が表示される
Latitude: 43.1175
Longitude: 141.381389
Country: Japan
Flightradar24 may, if needed, use your email address to contact you regarding your data feed.
Would you like to continue using these settings?
Enter your choice (yes/no)$:yes
Step 4.1 - Receiver selection (in order to run MLAT please use DVB-T stick with dump1090 utility bundled with fr24feed):
 1 - DVBT Stick (USB)
 -----------------------------------------------------
 2 - SBS1/SBS1er (USB/Network)
 3 - SBS3 (USB/Network)
 4 - ModeS Beast (USB/Network)
 5 - AVR Compatible (DVBT over network, etc)
 6 - microADSB (USB/Network)
 7 - SBSx via Basestation (localhost:30006)
Enter your receiver type (1-7)$:1 <--USBドングルタイプのレシーバなので1を選択
Checking for dump1090...NOT FOUND
Step 4.3 - Enter your additional dump1090 arguments or leave empty <--そのままEnter
Step 5.1 - Would you like to enable RAW data feed on port 30002 (yes/no)$:yes
Step 5.2 - Would you like to enable Basestation data feed on port 30003 (yes/no)$:yes
Step 6 - Please select desired logfile mode:
 0 -  Disabled
 1 -  48 hour, 24h rotation
 2 -  72 hour, 24h rotation
Select logfile mode (0-2)$:1 <--どれでも問題ないので適当に
Submitting form data...OK
Congratulations! You are now registered and ready to share ADS-B data with Flightradar24.
+ Your sharing key (sharing keyが表示されている) has been configured and emailed to you for backup purposes.
+ Your radar id is T-RJCOXXX , please include it in all email communication with us.
+ Please make sure to start sharing data within one month from now as otherwise your ID/KEY will be deleted.
Thank you for supporting Flightradar24! We hope that you will enjoy our Premium services that will be available to you when you become an active feeder.
To start sending data now please execute:
sudo systemctl start fr24feed
Saving settings to /etc/fr24feed.ini...OK
Installation and configuration completed!
修正する必要があれば、設定ファイルはetc/fr24feed.iniにあるので、viなどで編集しましょう。
USBドングル型レシーバは自動認識してくれます。
またfr24feedはインストールしただけで、自動起動設定までしてくれます。
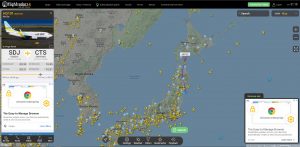
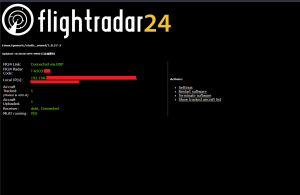
同一セグメントのPCやスマホからhttps://[Raspberry PiのIPアドレス]:8754にアクセスしてみましょう。
以下のように表示されていれば、正常に動作しています。(既に1機のADS-Bを受信しているようです😄)
ビジネスプランになりました!!
スコークの他、各スピード、外気温など表示されています!
私の自宅は比較的低層階なので、管理組合に相談して屋上に上げられると40ftくらいは稼げるかもしれません。
見通しが良ければUHF帯にも関わらず300km先の航空機も補足出来るような遠距離受信が可能です。
色々試してみたいと思います。
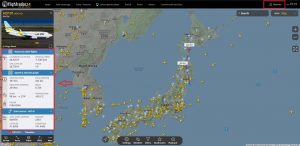
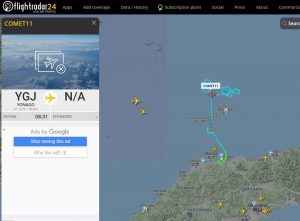
エアラインだけではなく、航空自衛隊や他の用途の航空機も見ることができます。
下のスクリーンショットは美保基地(米子鬼太郎空港)から上がったCOMET11(C-2輸送機)の飛行している状況です。
※2021年3月25日(某国から🚀が発射された日…ただの演習でしょうか?🤔)
コロナ禍でなかなか旅行に行けませんが、多少は旅行した気分が味わえますよ。(笑)
次回は、どこのご家庭でも余っているRaspberry Piで自宅でも大活躍する緊急地震速報装置を紹介しようと思います。
それとも、Airbus機のコールド&ダーク(電源入っていない状態)からの飛ばし方講座にしようかな…(笑)
…出来るだけ、仕事に関連する内容にします。(苦笑)
ankun