前回は(2)まで完了しているので
今回はiSCSI上のHDDを異なるサーバーからファイルシステムレベルで共有します。
○構築について
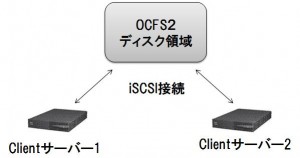
(1)物理的にもファイルシステムが共有できる必要があるため、今回はiSCSIで複数OSから接続したディスク領域にOCFS2環境を構築する。
(2)構築手順
①iSCSI Target サーバー(ディスク領域として接続される側)の構築
②iSCSI Client サーバー(接続する側)の構築
③Clientサーバー上でiSCSI接続したディスク領域にOCFS2ファイルシステムの構築
④共有ファイルシステム動作試験/性能測定
(3)構築例環境
OS:CentOS5.4
※https://oss.oracle.com/ から uname -r の結果にあったOCFS、OCFS tools をダウンロード
[root@client-1/2 #] cd /tmp/
[root@client-1/2 #] wget https://oss.oracle.com/projects/ocfs2/dist/files/RedHat/RHEL5/i386/1.4.4-1/2.6.18-92.el5/ocfs2-2.6.18-92.el5-1.4.4-1.el5.i686.rpm
[root@client-1/2 #] wget https://oss.oracle.com/projects/ocfs2-tools/dist/files/RedHat/RHEL5/i386/1.4.3-1/ocfs2-tools-1.4.3-1.el5.i386.rpm
※OCFS2/OCFS2-toolsをclient1、2にインストール
[root@client-1/2 #] rpm -ivh ocfs2-tools-1.4.1-1.el5.i386.rpm
[root@client-1/2 #] rpm -ivh ocfs2-2.6.18-92.el5-1.4.4-1.el5.i686.rpm
※OCFS2クラスタ設定ファイルの編集
[root@client-1/2 #] mkdir /etc/ocfs2
[root@client-1/2 #] vi /etc/ocfs2/cluster.conf
————————————————————————-
node:
ip_port = 7777
ip_address = 192.168.0.10
number = 0
name = test00.example.com
cluster = ocfs2
node:
ip_port = 7777
ip_address = 192.168.0.11
number = 1
name = test01.example.com
cluster = ocfs2
cluster:
node_count = 2
name = ocfs2
————————————————————————-
※hostsファイルの編集(test00.example.com/test01.example.com)
[root@client-1/2 #] vi /etc/hosts
————————————————————————-
以下を追加
192.168.0.10 test00.example.com
192.168.0.11 test01.example.com
————————————————————————-
※OCFS2設定
[root@client-1/2 #] vi /etc/default/o2cb
————————————————————————-
O2CB_ENABLED=true
O2CB_BOOTCLUSTER=fs
O2CB_HEARTBEAT_THRESHOLD=7
————————————————————————-
[root@client-1/2 #] /etc/init.d/o2cb configure
————————————————————————-
Configuring the O2CB driver.
This will configure the on-boot properties of the O2CB driver.
The following questions will determine whether the driver is loaded on
boot. The current values will be shown in brackets (‘[]’). Hitting
will abort.
Load O2CB driver on boot (y/n) [n]:
Cluster stack backing O2CB [o2cb]:
Cluster to start on boot (Enter “none” to clear) []: none
Specify heartbeat dead threshold (>=7) [7]: 7
Specify network idle timeout in ms (>=5000) [30000]:※ここ注意 短いと負荷があがった際にシステム再起動することがあります。
Specify network keepalive delay in ms (>=1000) [2000]:
Specify network reconnect delay in ms (>=2000) [2000]:
Writing O2CB configuration: OK
Mounting configfs filesystem at /sys/kernel/config: OK
Loading filesystem “ocfs2_dlmfs”: OK
Mounting ocfs2_dlmfs filesystem at /dlm: OK
————————————————————————-
※準備完了、OCFS2の起動
[root@client-1/2 #] /etc/init.d/o2cb online ocfs2
※片方のclientからファイルシステムを作成
[root@client-1 #] pvcreate /dev/sdc ※(fdisk -l などで確認して環境に合わせてください)
[root@client-1 #] vgcreate test-vg /dev/sdc
[root@client-1 #] lvcreate -n test-lv test-vg -L 10G
※client1/2両方からmount
[root@client-1/2 #] mount /dev/test-vg/test-lv /mnt/iscsi
[root@client-1/2 #] mkfs.ocfs2 /dev/test-vg/test-lv
この状態で片側のクライアントからファイル作成したり、削除したりするともう片側からも確認できます。
nfs環境の動作をファイルシステムレベルで実現。
次回は性能面の測定を行います。
waka